So many ranges, so little time:
A cheatsheet of animation-ranges for your next scroll-driven animation
Background
If you’re new to scroll-driven animations, welcome! To start, it might be a good idea to read this beginner-friendly introduction before diving into this guide. I touch on animation-ranges briefly in that article and here I’ll go deeper, covering the different values and what they mean. Let’s begin!
First, let’s do a quick recap of what animation-range is.
animation-range is used along with the view() timeline. That’s the timeline you would select if you wanted the animation to happen when the user is scrolling and your element is visible in the viewport.
But saying that my element is “visible in the viewport” can mean a lot of things. Here are the different ways in can be interpreted.
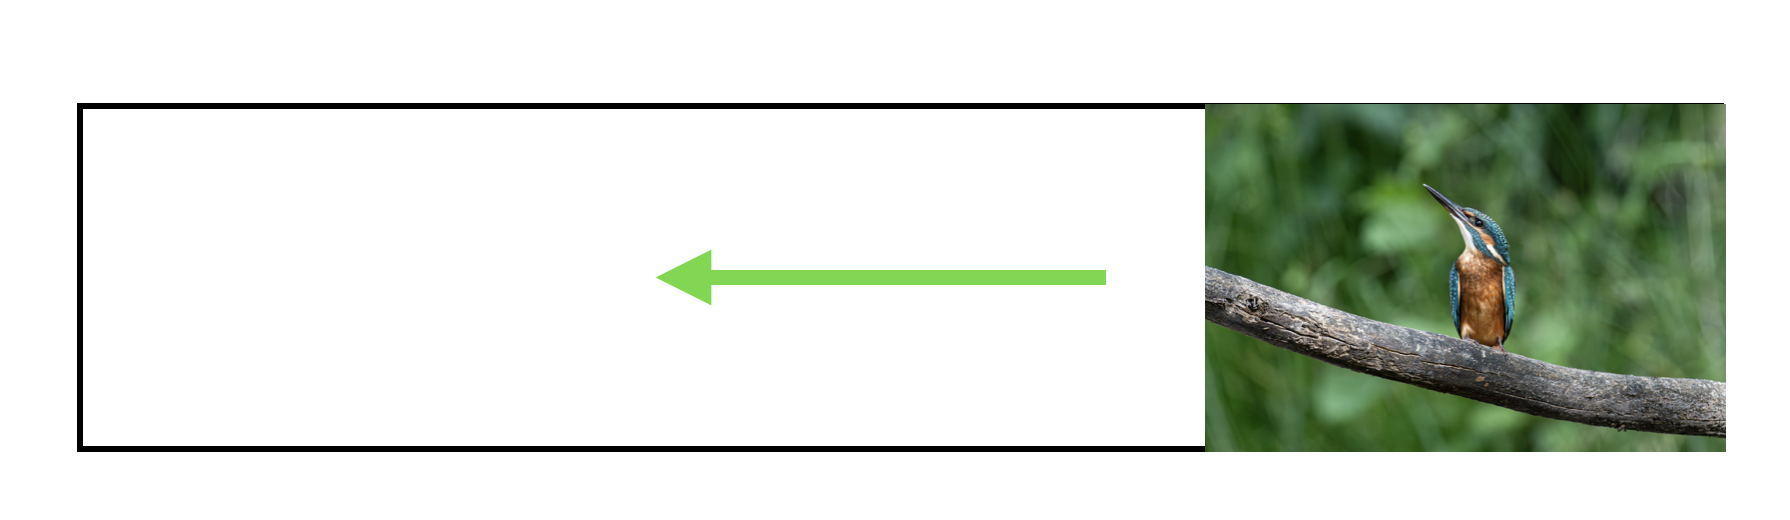
Let’s say that the element you want to animate is a photo with a height of 300px.
Does “visible in the viewport” mean you want to start the animation as soon as the first pixel comes into view? Or do you want to wait until the whole photo is visible? What if you want to start the animation when the photo is halfway through the page? Or if you want to stop the animation when it’s almost off the page, but not quite? So many options!
animation-range gives you the ability to be that specific, allowing you to be very particular in when exactly you start and stop your animation.
Definitions
animation-range is actually a shorthand for two properties: animation-range-start and animation-range-end.
animation-range-start allows us to specify when the animation will start and animation-range-end declares when the animation will end. For this article, we’re going to focus on the shorthand.
The shorthand can accept two kinds of values. The first is a timeline-range-name and the second is the length-percentage. Let’s dig into the timeline-range-name first.
The timeline-range-name defines the start and stop of the animation based on where the element is in relation to the viewport.
Let’s look at an example to illustrate.
Say you have an image that’s 300x200px in a container that’s 1000px wide. You want to start that image all the way to the right and have it slide over to the left of the container as you scroll.
Here’s the CSS for that animation:
img {
  animation: slideIn;
  animation-timeline: view();
}

@keyframes slideIn {
  0% {
    transform: translateX(700px);
  }
  100% {
    transform; translateX(0px);
  }
}
Now you have to decide — at what exact point do you want to start your sliding animation?
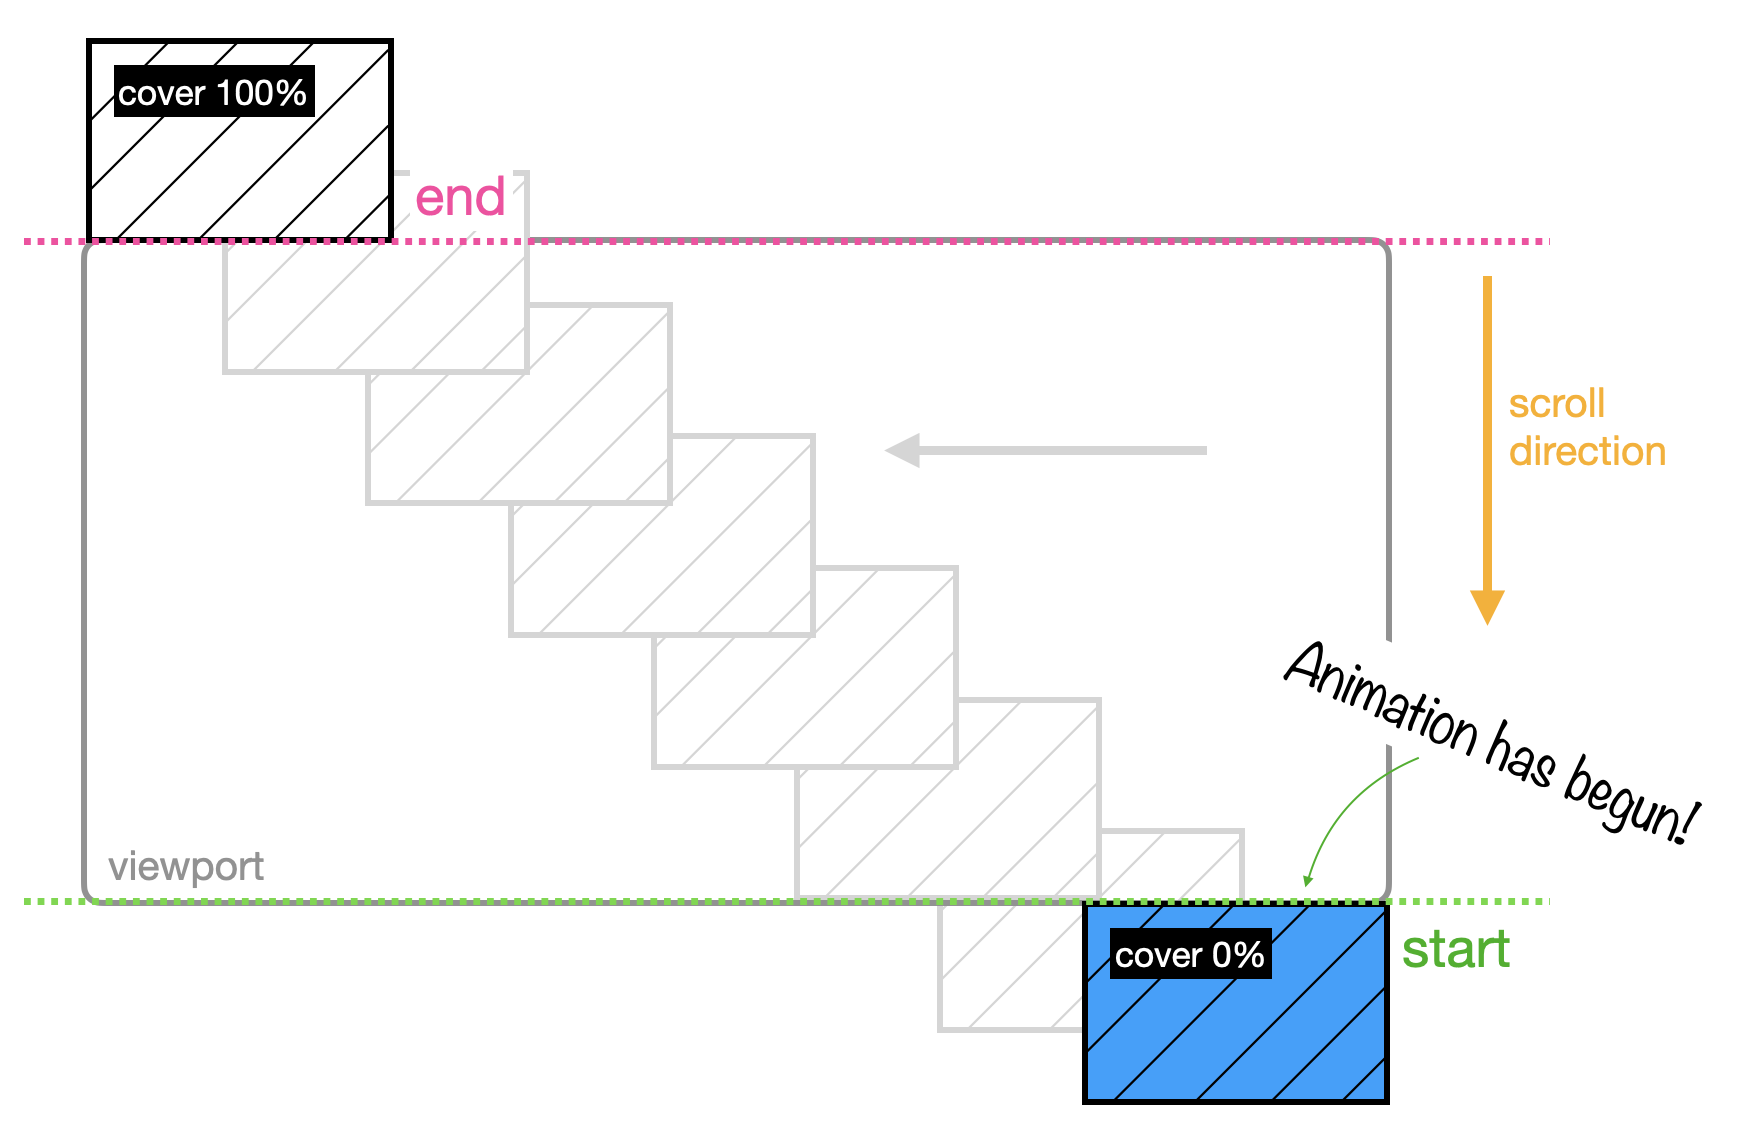
Cover
If you want to start your animation as the first pixel of your image enters your viewport, then you want to use the range cover. If used alone, it will set the start of the timeline (the 0%) right as the image peeps its head into view.
img {
  animation: slideIn;
  animation-timeline: view();
  animation-range: cover;
}
And it will slide your photo over to the left, all the way until the end of the timeline (the 100%) which is defined by the moment when the very last pixel disappears from view.
This means that even when just a sliver of the photo is in view, it will be animated. And when half of the photo disappears, it will still be animated, all the way until the image is completely gone.
Contain
If you want the animation to begin once the image is in full view and end right before it starts to exit, you’ll need a new range: contain.
img {
  animation: slideIn;
  animation-timeline: view();
  animation-range: contain;
}
Let’s see what that looks like.
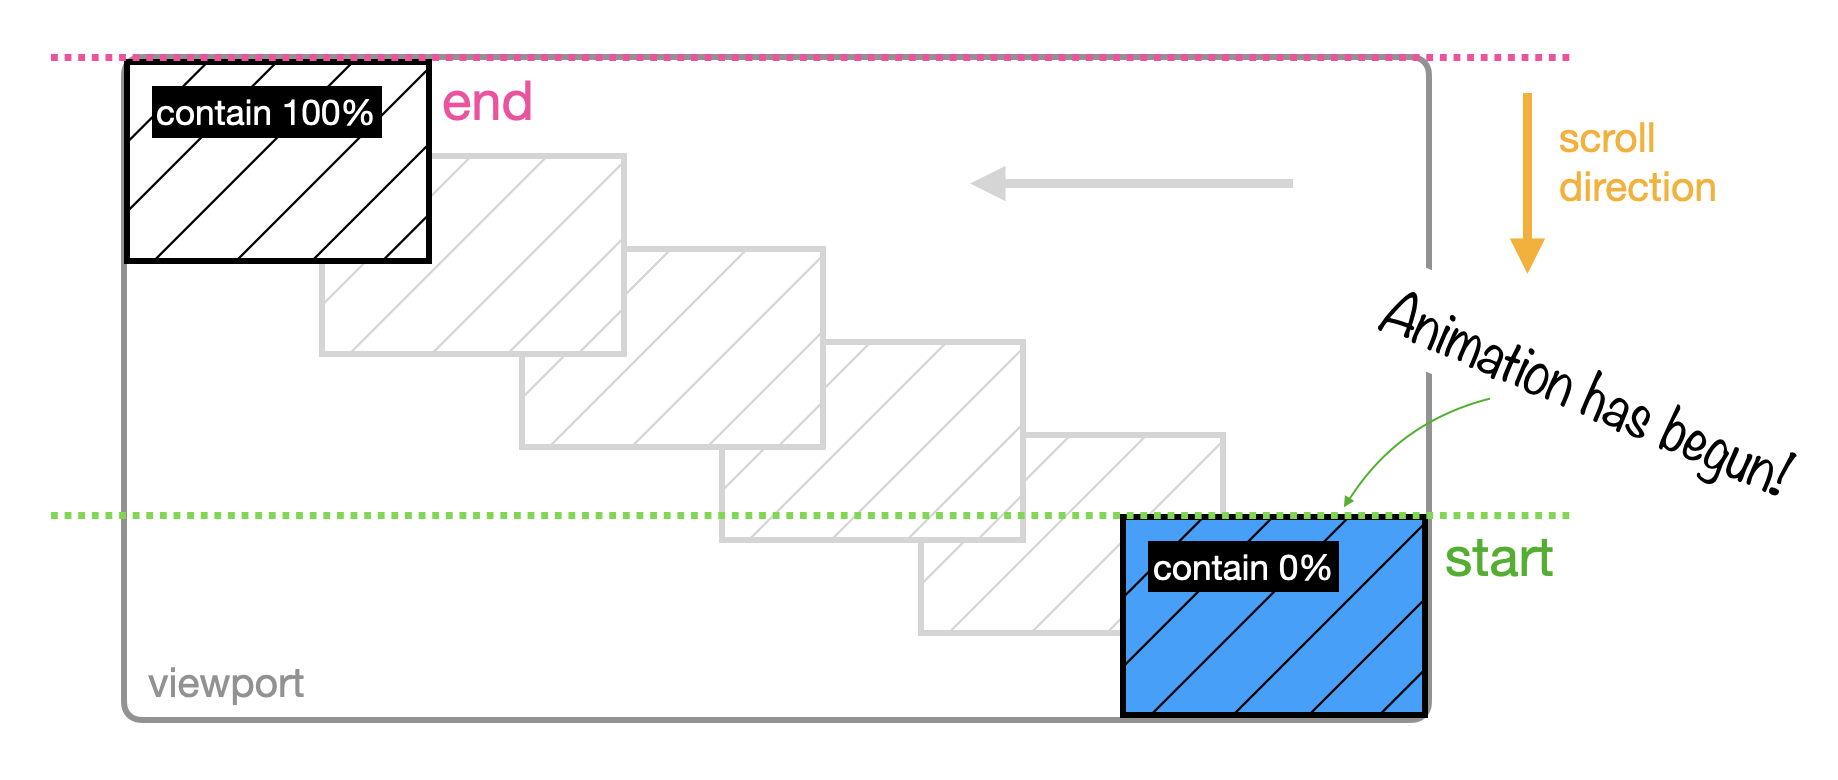
Here, the animation doesn’t begin on the first pixel — it waits until it’s fully visible. And when your image has reached the top and the first pixel disappears, the animation stops.
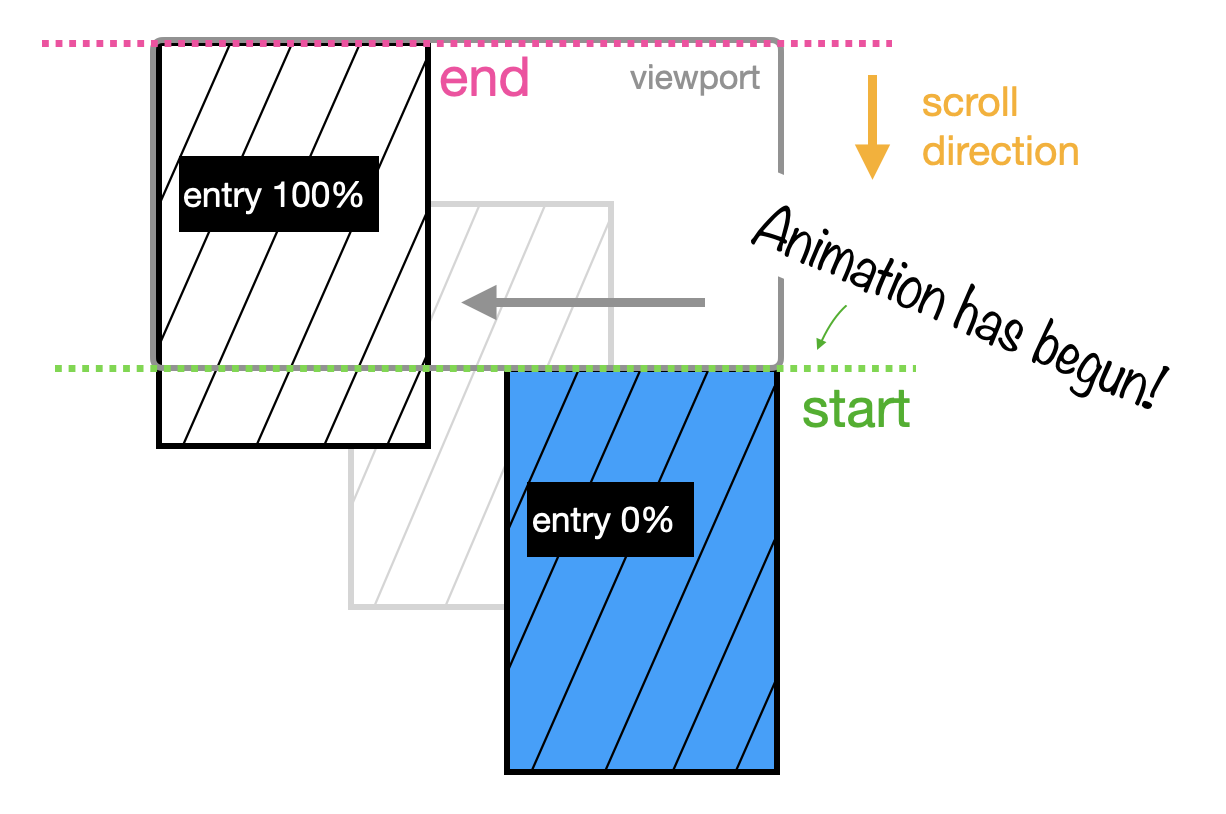
Entry
What if you want the entire animation, the start of it and the end of it, to all happen only as your photo enters the viewport? That means that when the first pixel appears on the screen, the animation begins. And when the the last pixel finishes entering the viewport, that animation stops. That’s what entry is for.
img {
  animation: slideIn;
  animation-timeline: view();
  animation-range: entry;
}
Here’s what that looks like.

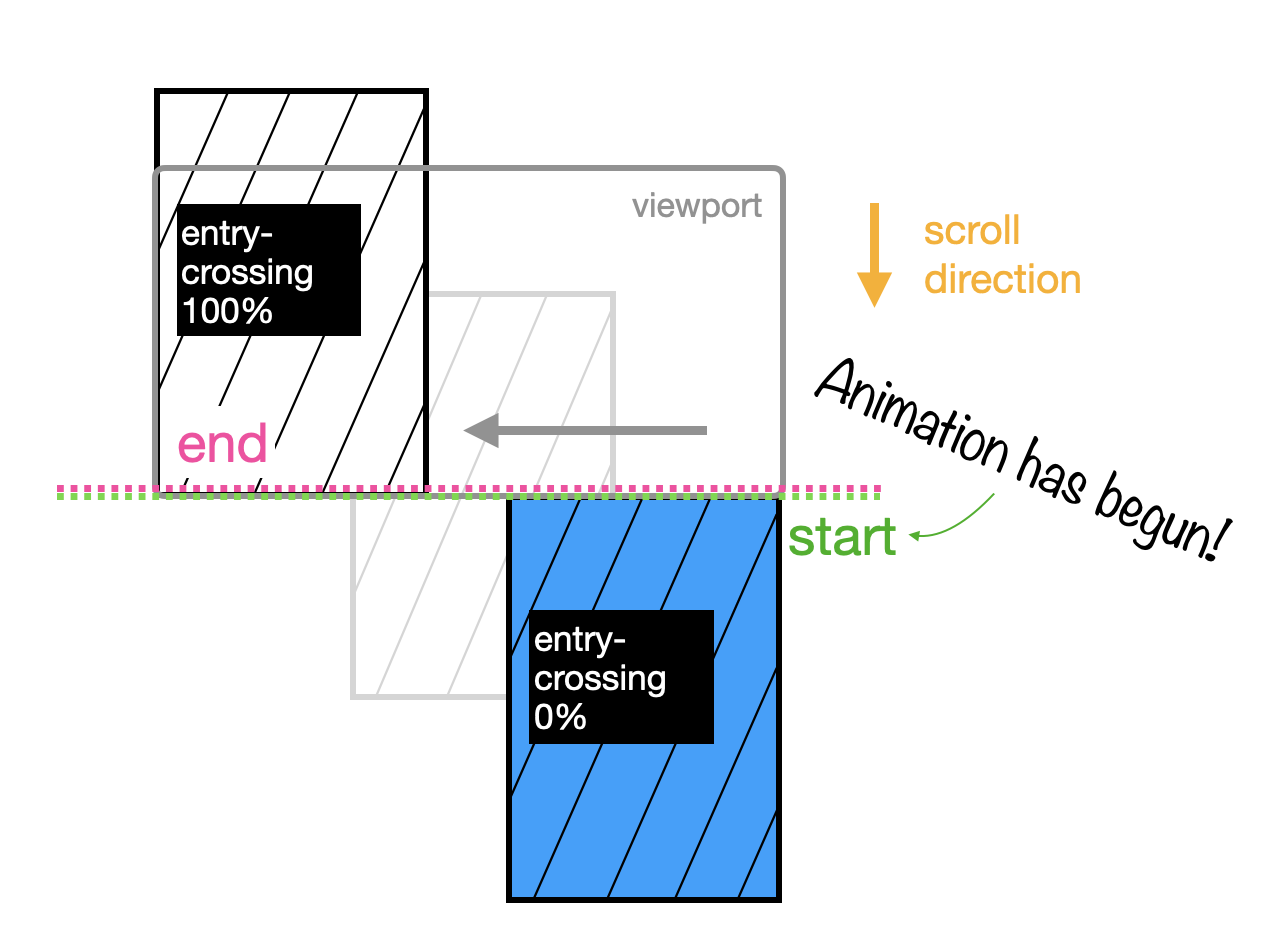
Entry-crossing (vs. Entry)
There’s another entry-related range called entry-crossing. It’s similar to how entry works with a key difference. entry starts the animation when the first pixel of the image enters the viewport, which marks the 0% point in your timeline. It ends the animation, marking the 100% point in your timeline, when the last pixel has fully entered the viewport.
But what happens when the height of the image is bigger than the height of the viewport? Is the end of our timeline, the 100% point, set as the moment the image first takes up the available viewport even if part of the image is still hidden and hasn’t yet entered the viewport? Or do you wait until the last pixel has crossed the entry and all of the image has passed through the viewport?
You can specify both scenarios with entry and entry-crossing.
If you pick entry and your image height is taller than your viewport, you reach the end of your timeline, the 100%, and end the animation as soon as your image fills the viewport.
Here’s what that looks like:
But if you pick entry-crossing , the 100% is set to when the last pixel in the image has crossed the entry and entered the view port, like this:
img {
  animation: slideIn;
  animation-timeline: view();
  animation-range: entry-crossing;
}
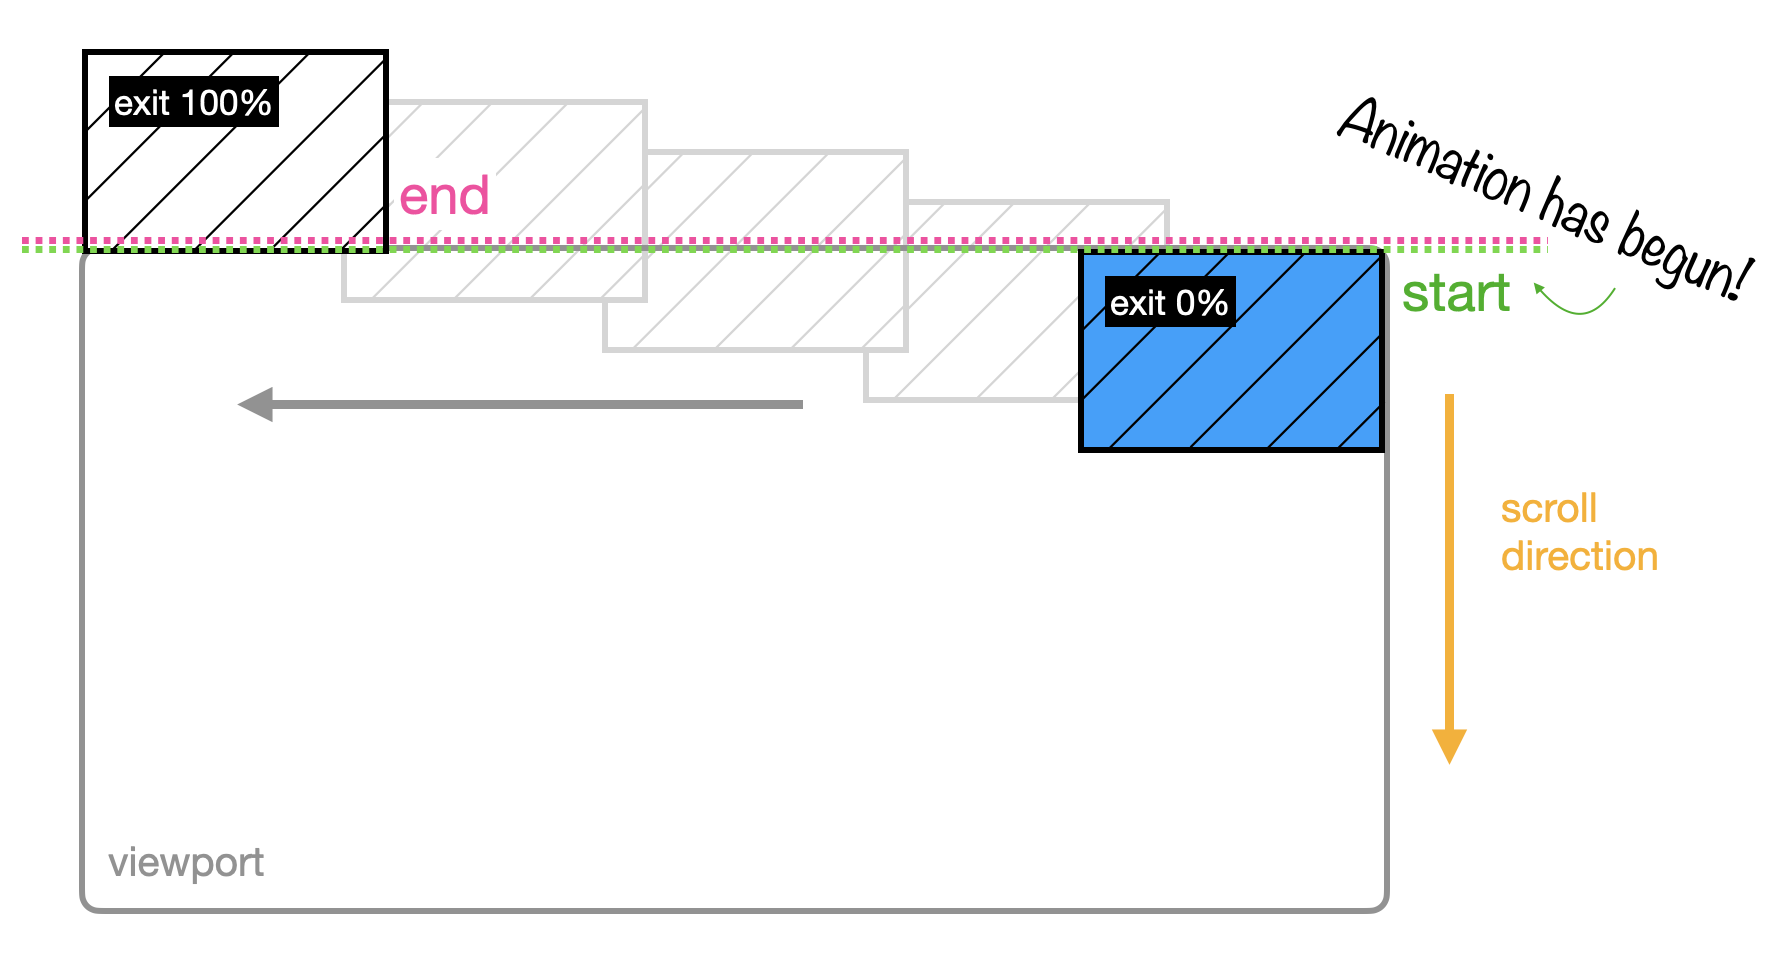
Exit
exit follows the same idea as entry, but instead of setting the 0% and 100% when the image enters the viewport, it sets it when the image exits the viewport.
It looks like this:
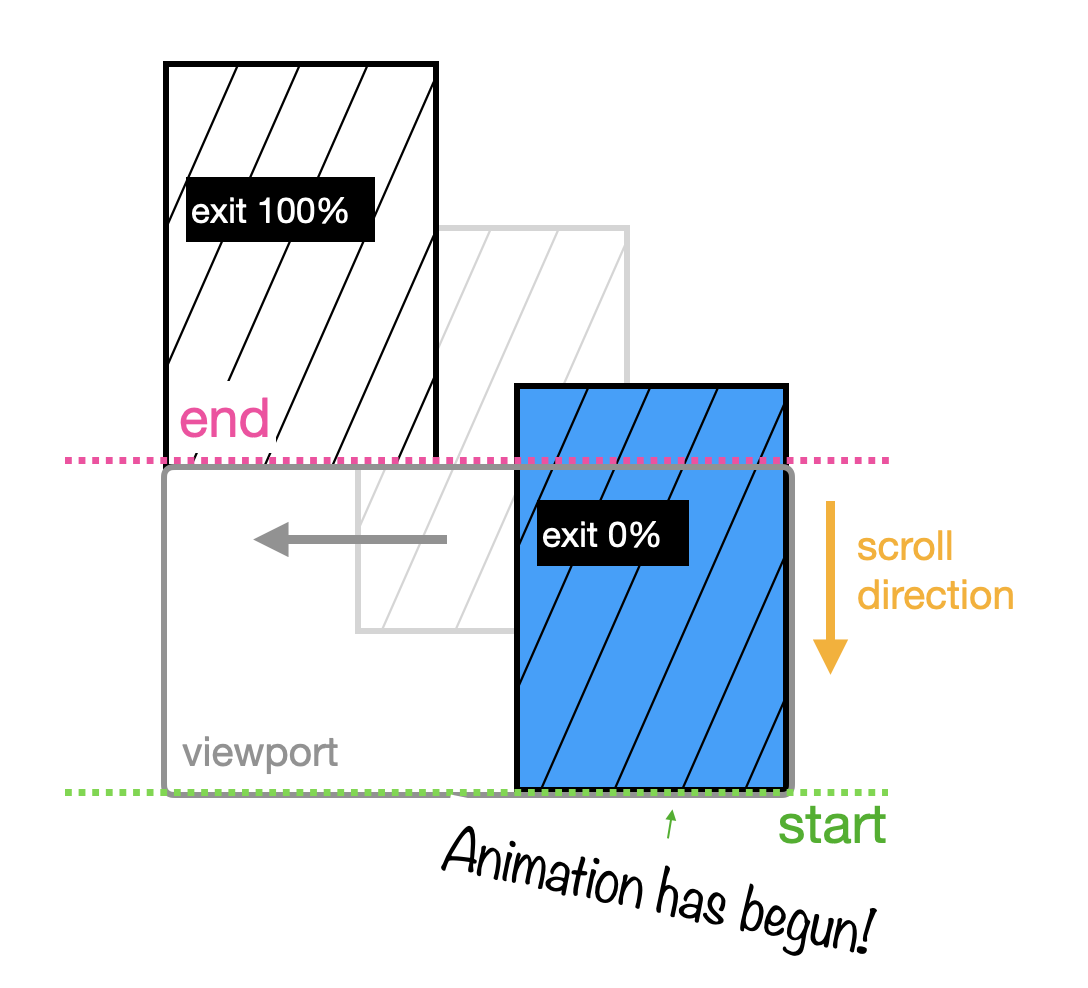
Exit-crossing (vs. exit)
exit-crossing has the same idea as entry-crossing . The difference between exit-crossing and exit is easiest to appreciate when the height of your image is taller than the viewport, so let’s look at an example with a tall image to illustrate.
When you use exit for an image that’s taller than its viewport, the 0% is set when the last pixel has entered the viewport and the 100% is set when the last pixel has disappeared, leaving the viewport.
img {
  animation: slideIn;
  animation-timeline: view();
  animation-range: exit;
}
Like this:
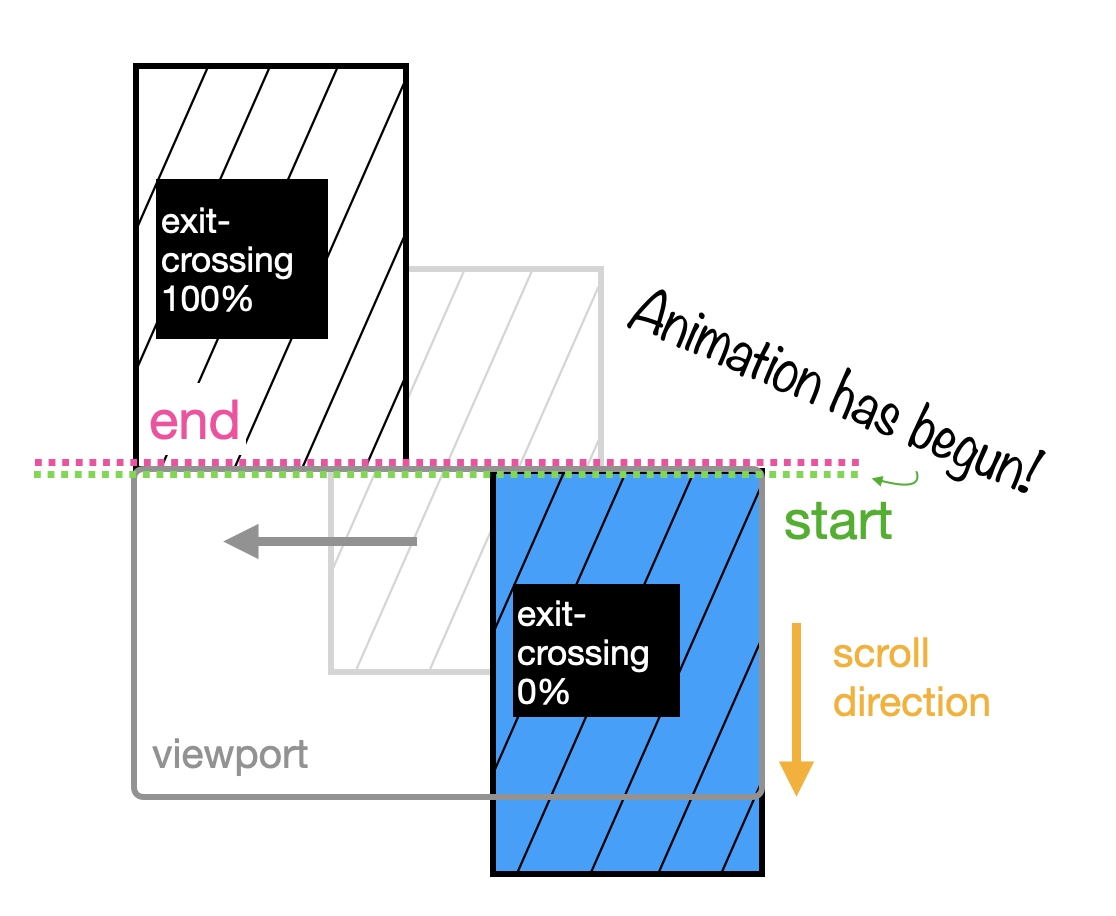
But for exit-crossing , the 0% is set at the point where the first pixel begins to exit the viewport, crossing the viewport’s edge, and the 100% is set when the final pixel disappears, like this:
img {
  animation: slideIn;
  animation-timeline: view();
  animation-range: exit-crossing;
}
That covers the different timeline-range-name s. They give you really great control of exactly when you want your animation to start and stop.
And for even more options, you can mix and match them. If you want to start your animation when the image first comes into full view but you want the animation to continue until the last pixel leaves, you can do this:
img {
  animation: slideIn;
  animation-timeline: view();
  animation-range: contain exit;
}
You might recall from earlier in this post that animation-range is a shorthand, so here I’ve provided the first value which is for my animation-range-start and the second is for my animation-range-end . And that’ll get me what I’m looking for.
Length-percentage
But let’s say you want to switch things up a bit. You don’t want to start your timeline until the image is fully visible, so you’re going to keep your first value as contain , but you want the animation to start halfway through your timeline, at 50%.
That means you need to explicitly set your <length-precentage> value in your animation-range , like this:
img {
  animation: slideIn;
  animation-timeline: view();
  animation-range: contain 50% exit;
}
And here’s what that might look like:
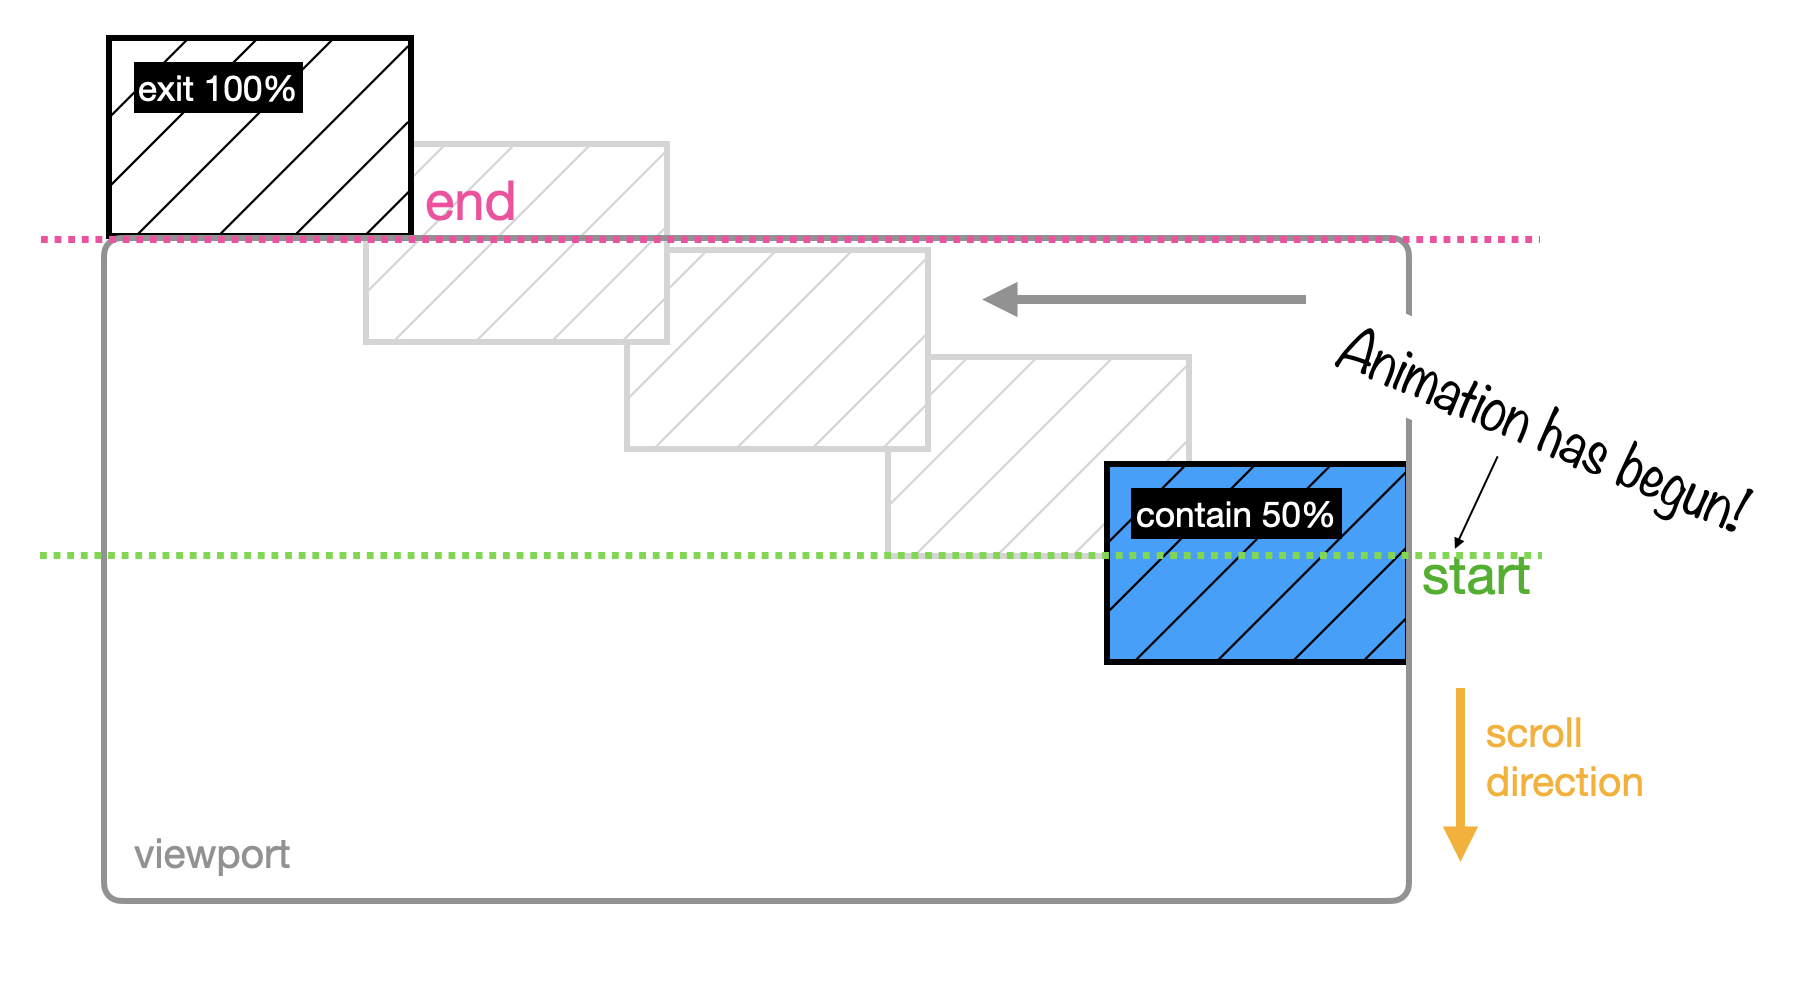
The <length-precentage> value type that can take a percentage or a length of any unit, giving you even more options and flexibility.
The options
So, if we wanted to customize every aspect of our animation-range value, we could define a animation-range-start and animation-range-end, declaring a timeline-range-name and length-percentage value for each.
And as a recap, the values for timeline-range-name are:
- cover
- contain
- entry
- entry-crossing
- exit
- exit-crossing
If we don’t declare any <length-percentage> values, they default to a start of 0% and an end of 100%. And if we don’t declare a timeline-range-name, it’ll default to a start of entry and an end of exit.
What will you animate with scroll-driven animations?
Let us know. Send me, Saron Yitbarek, a message on BlueSky, or reach out to our other evangelists — Jen Simmons, on Bluesky / Mastodon, and Jon Davis, on Bluesky / Mastodon. You can also follow WebKit on LinkedIn. If you find a bug or problem, please file a WebKit bug report.